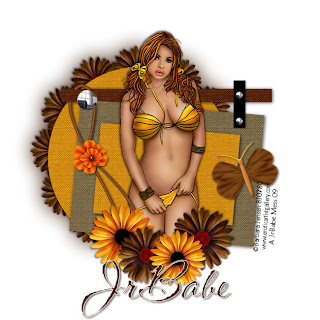
I used a FTU Scrap from Doris over at Scraps Dimension called Mustard Palette & you can find it Here. Please remember to say Thank You while downloading the scrap it only takes a few mins. Thank You Doris
I also used Template 120 of Missy's over at Divine Intentions. You can find it Here. Please remember to leave her some love as well. Thank You Missy.
I used the Beautiful work of Barbara Jensen.
Font is called Shishoni Brush or font of choice.
You will also need Mura Meister Copies.
Ok ready to make a tag? Let's do it.
Open your template & over on your Layer Palette delete the copywrite layer.
Click on the background over in your Layer Palette & Image, Canvas Size 650 x 650, Flood Fill White.
Click on your Circle Layer, Selections, Select All, Float & Defloat. Copy & Paste Paper 1, Selections, Invert & hit delete on your keyboard, select none. Delete your circle layer. Dropshadow Raster 1. V~1, H~1 Opac~70, Blur~10, Color Black
Again over on your Layer Palette. Highlight the thin rectangle. Selections, Select All, Float & Defloat. Copy & Paste Paper 2. Selections, Invert & Delete on your keyboard. Select None. Delete thin rectangle layer & Dropshadow Raster 2 same as you did before.
Click on the Large Rectangle. Selections, Select All, Float & Defloat. Copy & Paste Paper 3. Selections, Invert & Delete again. Delete the Large Rectangle layer over in the Layer Palette & Dropshadow Raster 3. V~2, H~2, Opac~70, Blur~10 & Color~Black.
Over on your Layer Palette click the Smaller Rectangle. Selections, Select All, Float & Defloat. Copy & Paster Paper 1. You know the drill, Invert & Delete. Delete that layer & Dropshadow Raster 4 V~2, H~2, Opac~70, Blur~10, Color Black.
For the other Small Rectangle. Selections, Select All, Float, Defloat. New Raster Layer & Flood Fill Black. Dropshadow it. V~2, H~2, Opac~55, Blur~5, Color~Black.
Copy & Paste your tube, Place where you wish & Dropshadow to your likeing
Add any Emblishments of Choice & Dropshadow them to your likeing as well. As my tut is only a guide.
Take the Brown Flower 2 & Resize to your likeing. Effects, Mura Meister Copies.
Number -12, ShiftX-50, ShiftY-50, Angle-0, Rotation-100, Phase-minus 25, Cycle-100, Attenuation-0, Scale-100, Tile Gap-0, Thru BG Range-0, ThruBG Smooth-30, Fade Out-0, Encircle. Duplicate & Move below the origanle. Adjust, Blur, Gaussian Blur, Radius 20. Hope that makes since. I'm not for sure how to show you the image. I'm still learning.
Dropshadow the oringal. Cirlce of flowers V minus 2, H minus 2, Opac-55, Blur-5 & Color Black.
Open the String Flower 1, Resize to your likeing & Copy & Paste it. Look at my tag for refrence & Dropshadow it, V-2, H-2, Opac-55, Blur-5 & Color Black. Move it below the Buttons Layer & Erase any parts to make it look like its hanging. If you would like the Flower to look like its bigger like mine, open one of the others & Crop it & Place it over the other one & Dropshadow it as above.
Resize one of the Butterfly's of Choice & Place it to the Right or where ever you would like & Dropshadow it as well.
WHEW & Your All Done!!
Add your Copywrite, Name & Crop to your likeing.
Thanks for trying another one of my Tuts...Hugs


No comments:
Post a Comment